Headlessly Streaming To Twitch with FFmpeg and Node.js
 Photo by Caspar Camille Rubin on Unsplash.
One late night many months ago, I was browsing the depths of Twitch.tv when I stumbled on a category I had never heard of before called Always On. These streams are, as the name implies, always on and continuously streaming content that can vary from cartoons to indie wrestling to movie marathons. I have not yet found one where a person is actually present on one of these streams since they run for days, weeks, or even months at a time. Often I found this category to be a comfort late at night when I couldn't sleep; it is nice to know the channel will be on any time (though of course some do go down due to DMCA or the channel owner changes what they are streaming). I wanted to see if I could recreate this experience for others, giving back in a way for all the hours I have spent in this category.
This article is going to focus on the development process from conception to completion and talk about some of the learnings that I had along the way.
Defining the Problem
Requirements:
- We should send video to Twitch from the program and have it output in the "Always On" category.
- For this iteration, there should be no overlay, chat commands, or anything else of that Twitch flavor; the stream should be as distilled as possible.
- When all the videos have played, it should restart at the first video to be truly continuous.
With these in mind, I think you could define this goal as: headlessly stream video to Twitch.
Exploration
I quickly learned that I cannot just send mp4s over to twitch but that I had to stream the data to them at one of their ingest servers using rtmp. I wont go into the details because I don't know much about it but in essence, we open a connection with the server and then we can stream data to it with very low latency. The ingest URL that Twitch recommended to me was rtmp://sea02.contribute.live-video.net/app/{stream_key}. The stream key on the end of that URL will handle the authentication so we don't have to worry about that, Twitch will already know what account is sending the data and associate the stream correctly.
I have never really dealt with video streaming; it is a totally new world to me. But the first thing I stumbled on when researching was FFMPEG. It is "[...] a collection of libraries and tools to process multimedia content such as audio, video, subtitles and related metadata" and you can learn all about it on the GitHub page. FFmpeg is quite ubiquitous and there are tons of packages to interface with FFmpeg use Node.js so I can use FFmpeg to get the videos and then Node.js to interact with FFMpeg to stream the videos to Twitch and to make sure the stream restarts when all the videos have been sent.
The First Iteration
My first step was to see if anyone had streamed like this with FFmpeg and after a few links, I found this:
ffmpeg -re  -i  "video.mp4" \
-pix_fmt yuvj420p \
-x264-params keyint=48:min-keyint=48:scenecut=-1 \
-b:v 4500k \
-b:a 128k \
-ar 44100 \
-acodec aac \
-vcodec libx264 \
-preset medium \
-crf 28 \
-threads 4 \
-f flv \
rtmp://sea02.contribute.live-video.net/app/{stream_key}`
If you are wondering what this all means, I had no idea either. Clearly FFmpeg is being called and -i means the input file and your output stream goes at the bottom. Then it accepts a bunch of parameters, specifies how many threads to allow FFmpeg to use, formats it to flv and then we have our output stream. Well, after installing FFMPEG and adding the exe to my PATH, I ran the command and...it worked. It was actually as simple as that thanks to FFmpeg doing all the heavy lifting of converting and streaming, I just had to specify an input fille.
And while this did work, it wasn't quite the end goal: this snippet only sent one video and it seemed to be consuming a lot more resources than I thought it should.
The Second Iteration
My next step was to move this from Windows over to a Linux environment and make it play multiple videos in a row.
WSL
I installed FFmpeg on WSL running Ubuntu with sudo apt-get install ffmpeg and then I used NVM to install Node.js. I found fluent-ffmpeg which makes interacting with FFmpeg in Node.js really easy. My second iteration of streaming to Twitch looked like this:
const PATH_TO_VIDEOS = '';
const STREAM_KEY = '';
const RTMP_SERVER = '';

const fs = require('fs');
const ffmpeg = require('fluent-ffmpeg');

const contents = fs.readdirSync(PATH_TO_VIDEOS, { recursive: true, withFileTypes: true });
const cleaned = contents.filter(file => {
    return file.isFile();
});

function stream(i) {
  if(!cleaned[i]) {
    stream(0);
  }

  ffmpeg(`${cleaned[i].path}/${cleaned[i].name}`)
    .videoBitrate('4500k')
    .videoCodec('libx264')
    .audioBitrate('128k')
    .audioCodec('aac')
    .inputOptions([
        '-re',
    ])
    .output(`${RTMP_SERVER}${STREAM_KEY}`)
    .outputOptions([
        '-ar 44100',
        '-pix_fmt yuvj420p',
        '-x264-params keyint=48:min-keyint=48:scenecut=-1',
        '-crf 28',
        '-threads 4',
        '-f flv',
        '-preset medium'
    ])
    .on('start', (commandLine) => {
        console.log('Spawned Ffmpeg with command: ' + commandLine);
      })
    .on('end', () => {
        stream(i + 1);
    })
    .run()
}

stream(0);
I wont go too deeply into this because I iterated on it pretty quickly but I will point out a few things. If you read my previous post, you will notice I used readdirSync correctly the first time :). We first read the content of the specified directory, filters for only files, and then add all the names as inputs to FFmpeg. Then I translated the FFmpeg command line into commands for fluent-ffmpeg.
This actually worked pretty well at chaining input files and keeping the stream going though I never actually got through a full cycle of videos. But at this point I realized that when I completed this project, I didn't want it running on my machine at all. If I was playing video games or watching Netflix then I didn't want this "Always On" stream to suck away resources from what I was working on. In addition, the command seemed semi-resource intensive (I forgot to take benchmarks) and I was nervous about bandwidth usage. I decided to look at my other options for deploying this stream.
The Cloud (and some math)
Some may consider this a tangent, feel free to skip to the next section as this doesn't cover anything super technical, just more requirement gathering for cloud costs.
To move this project off of my local computer, I considered renting a server since it would be totally detached from any of my resources. I also have bandwidth limits from my internet provider and, while they are fairly generous, I don't necessarily want to wake up to some massive bill one day for a pet project that I forgot about. But in order to choose the right server size (or assuage my concerns about my data caps), I would need to calculate my bandwidth usage to actually run this program.
The folder holding all my videos was 40 GB in size and the show overall has a run time of about 2900 minutes. There are about 43800 minutes in an average month and while any given file size may be variable, I know that the rate of data sent will be linear because every 2900 minutes, I will have sent 40 GB. That means we can use the formula of a line y = mx + b to calculate how much I will send in a month.
Because we are measuring the rate at which we are sending data, lets have the x values represent time while the y values are the amount of data we have sent. That means our first point of data can be represented as (0, 0) which means when we have spent no time sending data, we have sent no data. Our second point of data is (2900, 40) which is the equivalent of what we said above, that in 2900 minutes we will have sent 40 GB of data. And finally we have our third data point which is actually only half of a data point, the other half is what we are looking for. Phrased as a question it is "given the minutes in a month, how much data will I stream?" We know that there are 43800 minutes in a month so written as a data point, this question is (43800, y) where y is the amount of data we will send in a month. We have all the values we need now in order to solve for this y, starting with the slope of the line. In technical terms, the slope is how much a y coordinate increases in proportion to an x coordinate. In formulaic terms, it looks like this:
    y2 - y1
m = -------
    x2 - x1
We can use our two complete sets of coordinates to calculate the slope, (2900, 40) and (0 , 0). This is a pretty easy calculation since the line passes through the origin and it doesn't matter which coordinate is y1 or y2 as long as the corresponding x1 and x2 are the same; we would get the same value either way. With the data plugged in:
     40 - 0
m = --------
    2900 - 0
This gives us a pretty ugly decimal and we still have one more calculation to do so I will just simplify to m = (4/290). Using the unfinished coordinate (43800, y) along with the slope m = (4/290) and our y-intercept of b = 0 (we know this because our line passes through the origin), we can plug in our data into the formula of a line:
y = mx + b
y = ((4/290) * 43800) + 0
y = 604.1379310344828
which equals about 604 GB per month. Thats a lot of data! But now we can look to size our cloud server correctly since we have some parameters which are:
- Enough storage to store my video files (40GB) plus the operating system
- Enough bandwidth to send 604GB per month
I use Digital Ocean for my cloud provider on personal projects but the same calculations apply across all providers so choose whoever fits the bill! Based on the parameters, I did some pricing
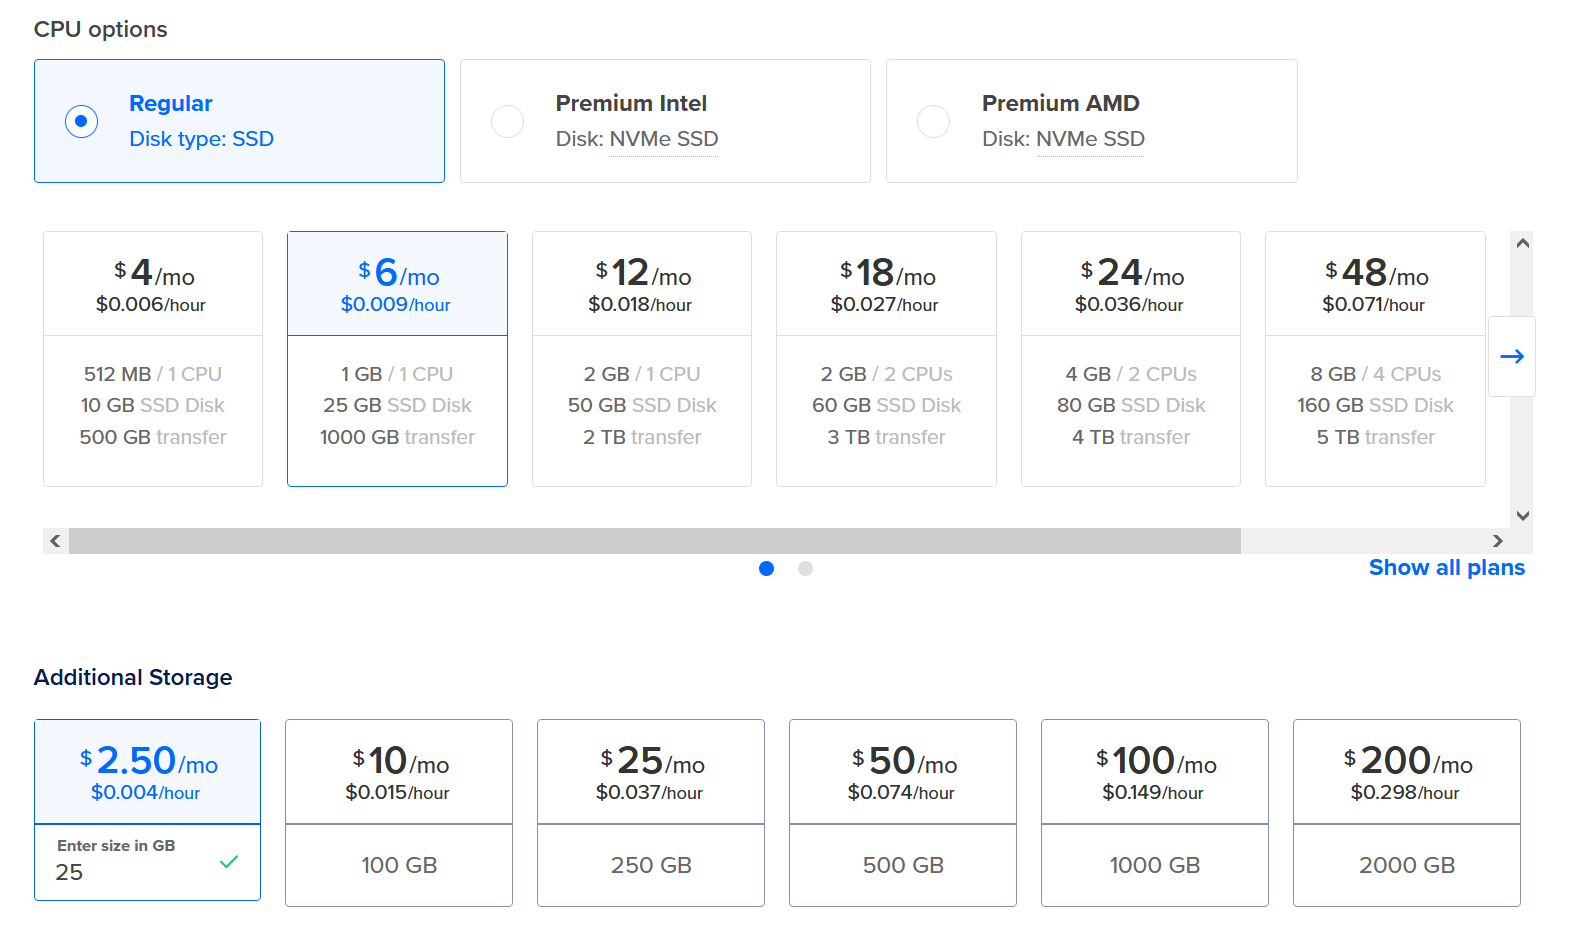
This would all come out to about $8.50 per month which is not bad at all.
Raspberry Pi
Another option I explored for moving the stream off of my computer was my Raspberry Pi 3 Model B+ (rpi) that I have had for about 5 years. I tinker with it every once in a while for side projects and it seemed like it could be a good option for this project if I could reduce the bandwidth I was using and resource usage that FFmpeg seemed to take. Worst case scenario, I could write and test all my code on the rpi and then when it was ready, rent a server and save a little money. A quick overview of what I did to get it ready:
- Wiped the existing 256 GB SD card
- Flashed the card with Raspberry Pi OS Lite - I wanted the OS to have the smallest footprint possible so FFmpeg could run faster
- Plugged it into a wall and connected a monitor and keyboard
- Set up the network and allowed SSH - from this point on I have unplugged everything except the power and interacted with it from SSH on my main computer on the network
- Installed FFmpeg and Node.js
- SCPed the files to the rpi
Unfortunately, the results from the code above was less than stellar.
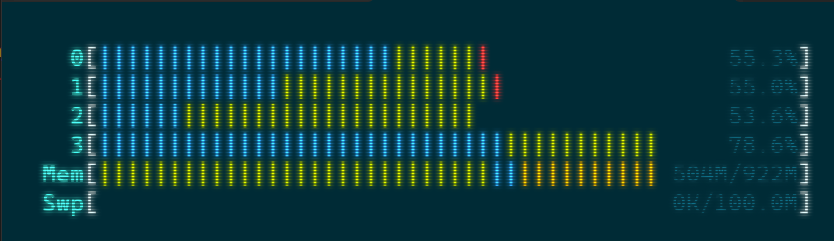
frame= 128 fps=5.0 q=33.0 size= 735kB time=00:00:05.45 bitrate=1103.1kbits/s speed=0.214x
You can see in the output above that the speed that we are streaming is 0.214x (the show is 30 fps and we are processing at 5 fps). Because each second we are processing only 1/5th the rate we need to be in order for the show to be in real time, the stream was unwatchable. Even increasing the CPU usage to 100% didn't actually change anything, we were still processing around 5 fps.
You might wonder "Why did the code work before?" Well the CPU on my computer is quite a bit better than the one on the rpi so without changing anything, the resources usage to process these files would be the same and the rpi just cant do the same throughput as my desktop CPU.
Something had been bothering me though since I had successfully run the stream on my desktop: Why was reading the MP4 and sending it over to the rtmp server using so many resources? It was finally time to dig into what commands I was passing to FFmpeg and see what I was doing wrong.
Preprocessing the Video Files
My initial thought was that maybe file size for the mp4s were just too big. My random guess was that FFmpeg didn't have the CPU power to convert the mp4 files to that output format of flv quickly enough and that by reducing the size of the files, the stream may potentially run smoother. In addition, the stream would be running 24/7 and using the same files over and over again so if I could pre-process and downscale the files outside of the streaming loop, I could potentially not only make the stream stable on the rpi but also reduce the amount of bandwidth I was using per month. If file size was the problem then awesome, everything would be fixed and I could stream from my rpi. If file size wasn't the problem for the resource bottleneck then at least I would have optimized my files to decrease the bandwidth I was using to stream them out. Because file size reduction was a win-win scenario in figuring out this problem, I decided to start with that.
Some quick Googling led me to three possibilities of things I could try with FFmpeg to downscale. First, the crf value. You can read about it here or here but basically the higher the number, the more compression you get which means the smaller your file size. Along with the crf, we could reduce the bitrate of the video which would also mean a smaller file size. And finally, after reading an answer on StackExchange, we could use a different video codec from libx264 to libx265. I am sure there are many other ways but these felt like solid leads that I, with almost not experience with these things, could accomplish.
Sparing many details here: after failing to build from source following this gist I eventually got a pre-built version of FFmpeg that had libx265 thanks to John Van Sickle. The conversion went well, for one file I noticed the difference:
- raw: 240 MB
- libx264: 179 MB
- libx265: 87 MB
The down-scaling code looked like this:
ffmpeg('video.mp4')
  .videoCodec("libx265")
  .output(`${OUTPUT_PATH}/${newName}`)
  .outputOptions([
    "-pix_fmt yuvj420p",
    "-crf 28",
  ])
  .run();
But problems began to arise when trying to stream these videos. Error messages that included Segmentation fault and Incompatible pixel format began popping up and the goal of this project wasn't to become an FFmpeg debugger but just to get a stream going. I decided these problems were out of my technical scope and so I returned to libx264. I tried a lot of various configurations like removing the video codec from the command, changing the crf value up and down, removing the pix_fmt, and a myriad of other things; FFmpeg has a lot of knobs you can turn in order to get output in just the way you want. I would downscale videos for hours at a time and see good results in the file size. But even after trying to downscale 10 different ways, the rpi still couldn't stream the video at a reasonable rate which meant that I was on the wrong trail and that it wasn't a video size issue at all: there was something else wrong in the FFmpeg configuration.
A silver lining of this whole process was that I was able to reduce the overall size of the show from 40 GB to 15.7 GB. Using our formula from above, that meant that instead of 604 GB of data per month, it would be about 237 GB per month so the time spent was not worthless.
The Final Pivot
Finally I stumbled on this post by slhck from 2012. The important information was this:
"You might not have thought about this before, but sometimes, you want to just copy the contents of a video and not re-encode. This is actually very critical when just cutting out portions from a file, or only changing containers (and not the codecs inside). In the example I gave above, we wanted to change MP4 to MKV. The following command is wrong: It will re-encode your video. It will take forever, and the result will (probably) look bad.
ffmpeg -i input.mp4 output.mkvWhat FFmpeg did here was encoding the file yet another time, because you didn’t tell it to copy. This command however does it right:ffmpeg -i input.mp4 -c:v copy -c:a copy output.mkv"
What a lightbulb moment: by not explicitly telling FFmpeg to copy video/audio codec, it was defaulting to re-encoding the video with libx264 which on an rpi 3 b+ is just too intensive. Fixing this issue is extremely easy in our code:
ffmpeg('video.mp4')
  .inputOptions([
      '-re',
  ])
  .videoCodec("copy")
  .audioCodec("copy")
  .output(`${RTMP_SERVER}${STREAM_KEY}`)
  .outputOptions([
      '-f flv',
])
Using this code, we can use HTOP again to check the resource utilization on the rpi:
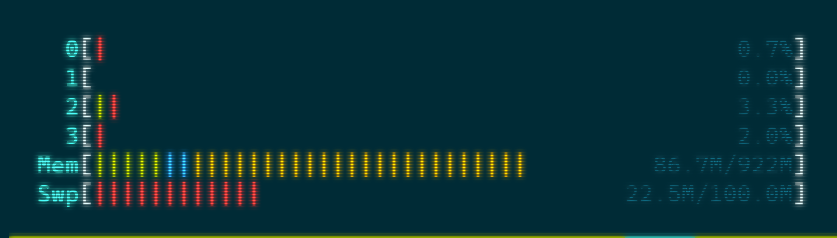
Things are looking good, there is basically no CPU usage and memory usage is way down.
Its Working Now...Kind Of
Once again, I have working code but there are still a few problems I want to tackle. The FFmpeg package we are using converts Node.js code and passes it to the FFmpeg binary. When I stream a video using that code snippet just above this section, FFmpeg receives the following:
ffmpeg -re  -i  "video.mp4" \
-ar 44100 \
-acodec copy \
-vcodec copy \
-f flv \
rtmp://sea02.contribute.live-video.net/app/{stream_key}`
What is the problem with this? Well earlier in the article I touched lightly on rtmp and how it opens a connection for us to send a stream of data. When we send FFmpeg this command, we tell it to open a connection to that Twitch ingest server at the URL we passed to it. Then when the FFmpeg command completes (i.e. when it finishes streaming the video), the stream closes. If we stream the videos in a loop like we did while the code was on WSL, FFmpeg is starting and stopping the stream after every single video which is not the behavior I want. At the very least, I would want the whole show to play before the stream is restarted.
I don't know all the technical details behind FFmpeg but from what I gather, FFmpeg is opening a connection and sending some packets that Twitch interprets as what we could call a "Stream Start" event. Then when FFmpeg finishes sending the video and closes the connection, it sends some packets that Twitch interprets as what we could call a "Stream End" event. Unfortunately I don't know how to intercept these packets or tell FFmpeg to keep the connection open though I bet there is probably a way to do it. Instead, I thought of two solutions.
The Preferred Way
The first solution is chaining the inputs on the FFmpeg command. That looks like this:
const PATH_TO_VIDEOS = "";
const STREAM_KEY = "";
const RTMP_SERVER = "";

const fs = require("fs");
const ffmpeg = require("fluent-ffmpeg");

const contents = fs.readdirSync(PATH_TO_VIDEOS, {
  recursive: true,
  withFileTypes: true,
});
const cleaned = contents.filter((file) => {
  return file.isFile();
});

function stream() {
  const video = ffmpeg();
  cleaned.forEach((file) => video.addInput(`${file.path}/${file.name}`));

  video
    .inputOptions(["-re"])
    .videoCodec("copy")
    .audioCodec("copy")
    .output(`${RTMP_SERVER}${STREAM_KEY}`)
    .outputOptions(["-f flv"])
    .on("start", (commandLine) => {
      console.log(commandLine);
    })
    .on("end", () => {
      stream();
    })
    .run();
}

stream();
For those curious, the output from something like this looks like a normal FFmpeg command with a bunch of inputs back to back like this:
ffmpeg -re  -i  "video1.mp4" -i  "video2.mp4" -i  "video3.mp4" \
-ar 44100 \
-acodec copy \
-vcodec copy \
-f flv \
rtmp://sea02.contribute.live-video.net/app/{stream_key}`
This is the preferred way to do it, FFmpeg will keep the connection open as long as it is still processing those inputs and then when it ends, it will restart the stream. Unfortunately for me, I had a lot of inputs and my "end" event was continuously being sent from FFmpeg which I imagine had something to do with either memory limits or a soft limit on the amount of inputs that you can pass to FFmpeg. I came up with something much more simple to get around this.
Non-Preferred Way
The second solution was to simply smash all the videos together into one big file and stream that. Combining the files together was fairly trivial and quick since we know now that we just need to copy the codecs and FFmpeg will run much faster. First, get a list of all the file names (this should include the file paths). I found this handy little bash command to do that
ls *.mp4 > filename.txt
Then you will need to go into the file and mass edit each line to look similar:
file '[FILE_PATH]/[FILE_NAME]'
For example it would look something like this:
file '/mnt/e/Videos/video1.mp4'
file '/mnt/e/Videos/video2.mp4'
...
I am sure there is a way to include that in the bash command above but like I said, I don't really know bash so I just did this part manually.
Once you have this file, you can run the magic FFmpeg command
ffmpeg -safe 0 -f concat -i filename.txt -c copy output.mp4
This command takes in the txt list of filenames and outputs an mp4 with them all combined. Personally mine went at about 730x speed since there was no re-encoding but your speed may vary.
Now that all the files are combined, we can simply feed that file into our app instead of the individual list of files.
Final FFmpeg Error
Even with all these changes, I would run the application which should, based on the code, continuously stream. But I found that the program would crash and since I was running it in a screen, it would crash, the screen session would end, and I would have no idea what the problem was. To fix this, I installed pm2 so that when the script exits, pm2 should bring it back online. Then I could use the pm2 logs command and see what the issue was that crashed the previous stream. In my case, the logs had an error of
Error: ffmpeg exited with code 1: Error writing trailer of
A quick google recommended that I add -flvflags no_duration_filesize to my output options. After adding this option, I have had no more crashing issues and the stream has run perfectly. My final script looks like this:
const VIDEO = "";
const STREAM_KEY = "";
const RTMP_SERVER = "";

const ffmpeg = require("fluent-ffmpeg");

function stream() {
  ffmpeg(VIDEO)
    .inputOptions(["-re"])
    .videoCodec("copy")
    .audioCodec("copy")
    .output(`${RTMP_SERVER}${STREAM_KEY}`)
    .outputOptions(["-f flv", "-flvflags no_duration_filesize"])
    .run();
}
stream();
This in conjunction with pm2 keeps the stream up at all times.
Conclusion
In summary, these were the steps I took to accomplish the goal of headlessly streaming video to Twitch:
- Choose your video files
- (Optional) Downscale your files to save on bandwidth
- Using FFmpeg and Node.js, chain your files together either into one video or pass many inputs
- Ensure that you are copying the audio and video codecs so that your CPU doesn't have to do any work
- Use an application watcher to make sure your stream automatically restarts if it ever goes down
When I started this project, I did not think it was going to take so long. Much of the time I spent on this was reducing the file size and trying to get the files to stream from my rpi because I did not realize that by not specifying a codec to FFmpeg, we were automatically re-encoding the files. The re-encoding process takes a lot of CPU power and goes much slower the older your hardware is. Thankfully once I found out that I can just copy the codec, the process of converting the files to the right format and sending them to Twitch was a breeze. And now I have a Twitch channel that is "Always On", hopefully some other lost soul out there will stumble on my channel and find comfort in it like I have many times.
See some errors or have suggestions? Email me at riderjensen at gmail dot com.